Saturday, November 13, 2010

mbed - Big Boys Arduino!

Hack-a-day described mbed as "Arduino. On steroids. With claws and fangs.", what's not to like about that?

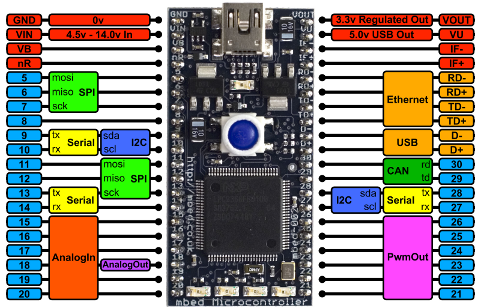
The mbed is a small module with 0.1" pins for mounting on a breadboard. It has an NXP (Philips) LPC1768 Cortex M3 ARM 100 MHz processor which has 512KB Flash, 64KB RAM and a stack of goodies including Ethernet, USB OTG, SPI, I2C, UART, CAN, PWM, ADC, DAC and GPIO (ordinary General Purpose I/O pins).


The development tools are unusual in that you don't install anything, when you register your shiny new mbed, you get an account with your own workspace and access to the web-based compiler and libraries.

To register, you just hook the mbed up to a USB port on your PC (cable provided) and click on the MBED.HTM file in the flash-drive that appears (being web-based it works for Windows, Linux and Mac of course). Less than a minute later (if you have a user name thought up) you can be set up and ready to go.

To run the demo 'Blinking LED' program just click on the download button and save it to the flash-drive your mbed appears to be. Press the reset button on the mbed and 'Presto!' the latest file to be downloaded is executed, it really is that easy.

The demonstration video to show the power and ease of development is well worth watching.

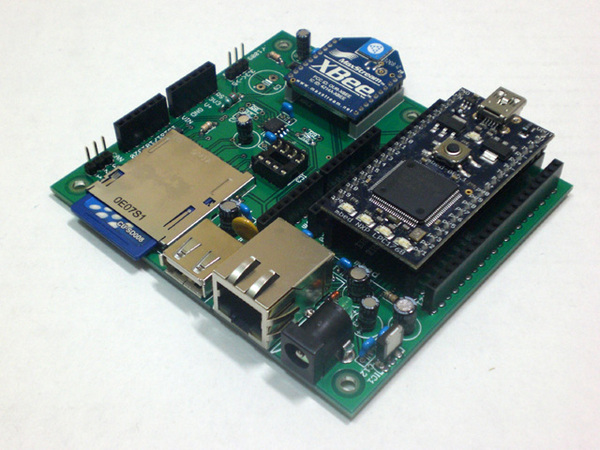
Anyway, the thing is that it looks like someone has made an mbed to Arduino Shield adaptor, so connecting to various ready-made peripherals should soon be even easier.


Considering the no-hassle compiler and libraries are free, the mbed is a quite reasonable proposition for dipping your toe in the ARM embedded development waters at about the same price as the far less powerful Arduino Nano.
I got mine from Element 14 (formerly Farnell) for about AUD $87.

Sunday, October 10, 2010

Virtualisation for Beginners

I recently learnt that Dr Dobbs Journal is no more, having just become a sub-section of Network World.


This prompted me to go pick up the article code ZIPs from the old web-site to trawl for any useful bits.

I pointed my Getright Browser Tool at - ftp://66.77.27.238/sourcecode/ddj/ and downloaded the lot (1.31GB of zip files) while it is still there.


Amongst the goodies I found that I had downloaded a zipped image for a Ubuntu Dot.Net Development virtual machine.

I put this Zip and the FREE VMPlayer from VMWare onto an old 786MB / 40GB / AGP video Pentium PC running fully up-to-date XP SP3.

Honestly, there are probably better machines hardware-wise put out for recycle at the side of the road.

I unpacked the 1GB ZIP which became about 11GB on account of a 10GB disk image in there.


I installed and ran the VMPlayer and was happy to see that it actually ran OK on such a low-spec machine and handled the wireless 11n NIC OK.

I tried to run the Ubuntu virtual machine but if failed as it was created to run as a 2-CPU machine though luckily only with 512MB RAM.

I changed the VM settings (so easy that the cat could do it) to 1 CPU and away it went.


Then VMPlayer announced that my Linux VMWare Toolkit was out of date and offered to fix it up while I was still using the Ubuntu VM.

I accepted and the tools were downloaded verified and mounted so that they suddenly appeared as a CD inside the Ubuntu VM, Impressive!

I opened the .tar.gz tools archive file on the CD and dragged the contents to my home/user directory and they were uneventfully extracted.

I then ran the enclosed .pl install script and voila, my Ubuntu virtual machine is all updated with the latest VMWare tools.


Now I can play with Ubuntu Dot.Net development any time I want without having another old PC hanging around.

Actually, I’m tempted to get VM Workstation and make a VM of the old XP machine so that I can run IT under Windows 7 in the future.

And NO I won’t even try and run Ubuntu in VMWare in the virtual XP machine, I’ll make a separate Ubuntu machine. :-)


So, two take-aways from this –
  1. Getting a hands-on taste of Virtualisation is cheap and easy, and…
  2. You don’t need a high-end machine to experiment on (and get some Virtualisation experience you can claim when job-hunting).

Have a go! :-)

Thursday, March 25, 2010

General: My Obesity Solution

Here is a passing thought I will share with you.
The media and doctors are all brow-beating us about how the population is becoming obese.
Well surely, if so many people are becoming obese, then it should be time to redraw the height/weight scales that are used to determine 'normal'.
If you think that would be cheating consider this - the scales currently in use were derived post-war after years of rationing where people barely saw sugar or butter or any sizable piece of meat, is that fair? Is it pure coincidence or artistic incompetence that paintings and books from previous centuries depict a great many portly people? (Think 'Pickwick Papers').
I think that losing weight might be a good plan, but I am not convinced that we are being judged fairly.

Others doubt the BMI too!

Update: A nice kicking for BMI on The Register -'Being fat is no worse for you than being a woman'

Friday, January 29, 2010

General: Embedded Development

Unless you are manufacturing your own line of products, embedded development starts with a customer wanting to create or improve a new or existing product.
Then follows a lot of question and answer and,l usually, research to identify the possible range of solutions, from off-the-shelf to fully-custom, and consider their respective strengths and weaknesses.
If it seems to both parties that a custom solution is the best option, you may have work to do, if the business matters are agreeable to you both.

Then, in theory, begins the thinking and design of a possible solution, although in practice quite a few possibilities will usually have occurred to the designer during the discovery phase.
The next step is fleshing out the component parts of the overall solution, which may start as no more than a few quickly drawn ideas, like so -


These rough ideas are frequently tested by the designer, either as components, or as a part of a whole solution. Whilst the older method is to build test hardware, a lot of people opt for simulation nowadays.
In order to produce the prototype, the schematic designs must be entered into the design tool and parts created and added to the library if it does not contain the required part, or not one in the required physical package.


When the complete schematic is entered and verified for electrical consistency, the board layout can be performed. An important first step here is entering the manufacturing capabilities of the PCB company as a set of design rules that your board must conform to.


When the layout is complete, a set of files can be sent to the PCB manufacturer and a small batch of prototype boards ordered. It can typically take 5-10 days to receipt of the finished boards, although speedier options exist for higher prices.

This board is mostly Surface-Mount, apart from power devices all lined up to share a common heatsink and the much cheaper through-hole electrolytic capacitors. The hardest-to-solder ARM processor goes on first to give unimpeded access to it!
Once the prototype is fully debugged, actual assembly will be performed at the PCB manufacturers, but for the prototype it's a job for a good eye and a steady hand.

Once all parts are fitted, the board can be fitted into the prototype hardware and then the software programming and debugging can commence!


In this case, a JTAG port makes software development and testing much easier.

Larger size photo's can be viewed in this Flickr set.

Saturday, January 23, 2010

General: Test your ISP!

This summary is not available. Please click here to view the post.